

Step One • Get Debian • Options
1. Get Debian 5 (Lenny)
- Get the installer
- Burn an ISO image
2. Pick your options
1a. Get the installer
If you haven't got it yet, go and get the Debian 5 installer. In case you have a fast internet connection, download the netinstall CD. Get the i386 version if you have an Intel machine. Choose something else if your computer has a different processor, for example AMD. If you don't know what kind of PC you have, click: - + system info. -
Windows: click start => My Computer => View system information
As you can see, this PC has an Intel processor:

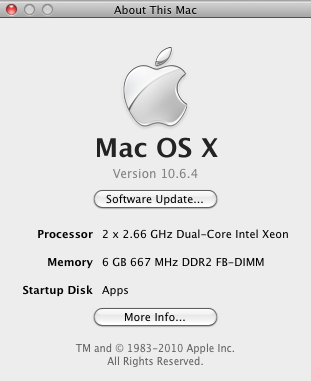
Mac: on the menubar click the apple => About This Mac
As you can see, this computer has an Intel processor:
Linux: in Terminal run cat /proc/cpuinfo
As you can see, this PC has an Intel processor:

1b. Burn an ISO image
Burn the downloaded ISO image to a CD. How? Go back to 3a. Lenny for instructions.


2a. Installer boot menu
Start up the PC using the netinstall CD. Pretty soon you'll see the Installer boot menu.

We'll use the Install option, so hit Enter without changing anything.
2b. Language
Here we see a choice of languages:

You need English if you want to continue using the instructions on these pages. Hit Enter.
2c. Country
You'll see a screen with country options:
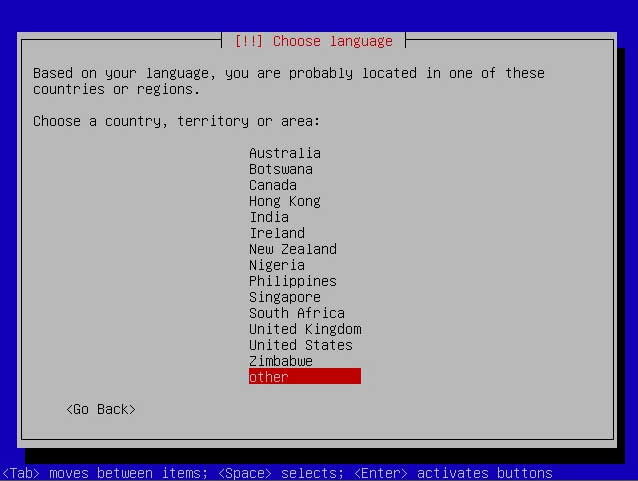
During installation you can move between options using the arrow keys on your keyboard. If your country is absent from the list, move to other, then hit Enter. Next you'll see continents and other areas:
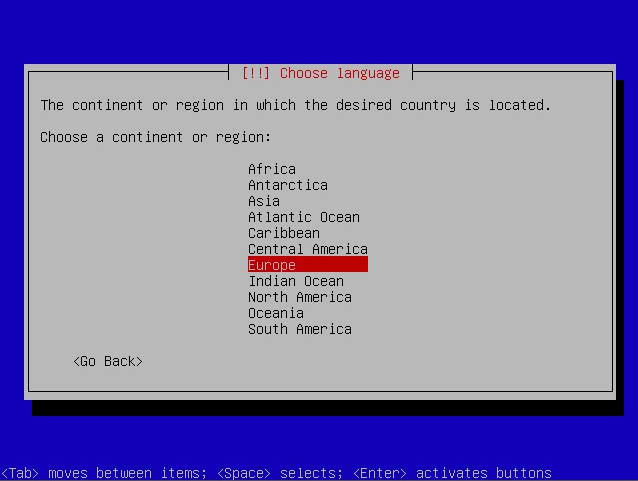
In the list above use the arrow keys to make your choice and hit Enter.

In the list above, type the first character for your country of choice, for example N for Netherlands. If necessary, use the arrow keys to go up or down. Then hit Enter.
2d. Keyboard

If you want to avoid headaches, stick with the American English keyboard layout. Some people have reported issues with other keyboard layouts. So make your choice and hit Enter.
Tip! Pay attention to the information at the bottom of every screen: <Tab> moves between items; <Space> selects; <Enter> activates buttons.
2e. Computer action
Wait until your PC is ready for the next step.

Not ready yet. Your PC is getting ready for the internet.

2f. Hostname and domain name
Your host and domain name together could look like: server.domain.com. In this case, server would be the hostname, whereas domain.com would be the domain name. You may also choose other combinations, for example linbox.web.net, or whatever. On these instruction pages, we'll go for server01.yourdomain.com, but you're free to do it your own way.
Choose anything you like, for example linbox or boo, instead of this example: server01 (where 01 is typed as zero one).

Hit Tab, then Enter to continue. You may also skip hitting Tab and just hit Enter.
Next, you'll see a screen prompting you for a domain name:

Pay attention here!
The domain name may have impact on your webmail. Some people report that they can send mail from their website from, for example, domain1.com, but not from domain2.com. If, after installing your server, you cannot send webmail (for example from content management systems (CMS) like Drupal, Joomla!, WordPress) you may have to reinstall the server choosing a different domain name.
If your name is Goldfish and your email address is goldfish@provider.com or gold@provider.com, you could choose goldfish.com or gold.com as your domain name. Your hostname plus domain name could thus be: linbox.gold.com.
TIP! Keep notes of your choices and stick to whatever works for you.
Instead of yourdomain.com you may now enter gold.com or web.net or any other domain name of your choice. Then hit Enter.
Next, you're asked to pick a partitioning scheme:
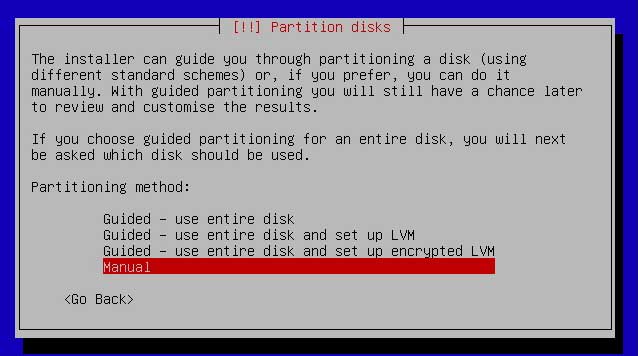
We'll choose Manual. Go on to the next page.