

Step Eight • Install & tweak servers
16. Synchronize system time with NTP
- Time synchronization
17. Install servers and more stuff
- Install Postfix, Courier, Saslauthd, MySQL, phpMyAdmin, rkhunter, binutils
18. Tweaking servers and other stuff
16a. Time synchronization
You can synchronize your system clock with the time on your local network using NTP (network time protocol).
You can select the code below, copy it (Ctrl-C) and paste it (Ctrl-V) in your Terminal window...
... and hit Enter. Question: do you want to continue? Type y ...
... and hit Enter.


17a. Install Postfix, Courier, Saslauthd, MySQL, phpMyAdmin, rkhunter, binutils
You're now going to install mail and database servers and some other components. A short explanation: Postfix runs webmail, Courier is a mail server, Saslauthd is an authenticator to keep crooks away, MySQL is a database server, phpMyAdmin is a web-based database interface, rkhunter is a rootkit scanner for finding creepy things like trojans, binutils is a program compiler.
Select and copy the code below:
... and then paste and run it in Terminal:

When you're asked whether to continue or not, type y ...
You'll get questions. We tackle those below.
18a. Configure the MySQL database server
During the installation process you'll get questions. First you need to give a password for the MySQL root user. If you're setting up your server only for your own experience, you won't need heavy security, so you could repeat a password you're already using.
Keep notes of what you're doing or you'll lock yourself out later. Later, in paragraph 27b on the ISPConfig3 installation page you'll be asked to give this very password.

After typing the password, hit Enter. Then repeat the password:
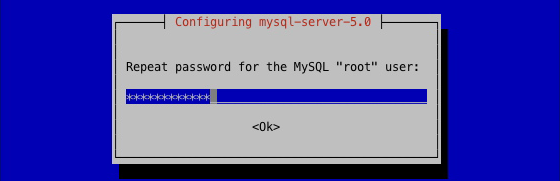
... and hit Enter.
18b. Tweaking the mail server
Courier wants to create certain directories, but we don't need them.

With <No> selected, hit Enter.
If asked for the mail configuration type for Postfix ...

... just hit your keyboard's Tab key to select <Ok>, then hit Enter.
We want mail to be available for the internet, so ...

... with Internet Site selected, hit Enter.

Type your own webmail domain name. If you don't know it, leave the address that's already there, then hit Enter.
TIP If, at a later stage, your webmail messages won't arrive, the problem might be rooted here.
We move on configuring the Courier mail server. Certificated required?

OK, so hit Enter. Your system is going to be a bit busy now. You'll know that it's ready when the Terminal calms down and shows your equivalent for:
18c. MySQL tweaks
The MySQL database currently only listens to localhost on 127.0.0.1. Next, you'll tell it to listen to all hosts. To that end, open the file my.cnf and comment out the line:
bind-address = 127.0.0.1
by typing a preceding hash: #bind-address = 127.0.0.1.
So, open my.cnf, located in directory mysql inside directory etc, using the vi editor, by running:
You are now ready to start editing the MySQL configuration file using vi:

Using your keyboard's arrow keys, scroll down to the line starting with bind-address:

Hit the i on your keyboard to start editing and type a hash # to comment out bind-address:
Save changes and quit vi by hitting the Esc key and typing :wq.
Now you restart the MySQL server by running:
When MySQL is running again, you'll see this in the Terminal:

Check if MySQL is indeed listening to your network. Run:
If you see your own equivalent on your screen for this:

... you're OK. If not, you should check what you may have done wrong earlier and repeat steps.
18d. Some more tweaks: Courier
Mail is secured by SSL. The security certificates for IMAP and POP3 were configured for localhost. They should be adjusted to work for your host, that is, your equivalent for server01.yourdomain.com.
We'll do this in 3 steps: we'll remove the 2 old certificates, modify 2 existing files and create 2 new certificates.
In order to remove both old certificates and for the sake of playing safe, first change directories. Go to /etc/courier by running:
Just for your information, compare the position of the hash # on your Terminal screen to convince yourself that your location has changed from / (root) to /etc/courier:
Once you're inside directory courier you may remove some files there. First remove (rm) the IMAP certificate by running:
After that, remove the POP3 certificate by running:
Now we have to tell IMAP and POP3 the host/domain name. For IMAP, open imapd.cnf in vi by running:
In the file imapd.cnf move the cursor to the line CN=localhost

... and change it into your equivalent for server01.yourdomain.com:
Save the changes and quit vi by hitting the Esc key and typing :wq.
For POP3, open pop3d.cnf in vi by running:
In the file pop3d.cnf move the cursor to the line CN=localhost

... and change it into your equivalent for server01.yourdomain.com:
Save changes and quit vi by hitting the Esc key and typing :wq.
With these changes made, you can recreate the certicifates you have removed before. First do it for IMAP. Run:
Wait for the process to end. Then do it for POP3. Run:
Wait for the process to end. Then restart SSL for IMAP and POP3. For IMAP, run:
After the stopping and starting for IMAP-SSL have been carried out, do the same for POP3. Run:
So far, so good. Let's go to the next page.