

Step Nine • Antivirus • Apache2 • FTP
19. Virus and spam fighters
- Install Amavisd-new, SpamAssassin, ClamAV
20. Apache webserver and modules
- Install Apache2, PHP5, phpMyAdmin, FCGI, suExec, Pear, mcrypt
21. FTP server and quota
19a. Install Amavisd-new, SpamAssassin, ClamAV
Amavisd-new is an interface between mailers on the one hand and virus and spam scanners on the other, where SpamAssassin fights spam and ClamAV fights viruses.
In order to install these programs, select and copy the following code and paste and run it in Terminal:

... hit Enter.


20a. Install Apache2, PHP5, phpMyAdmin, FCGI, suExec, Pear, mcrypt
Next we'll install the Apache2 webserver, server-based script language PHP5, MySQL web-based interface phpMyAdmin, server-based script language FCGI, Apache module suExec allowing script execution with different user-IDs, PHP facilitator Pear, encryption program mcrypt and more Apache modules.
In order to install the server and modules, select and copy the following code and paste and run it in Terminal:

When asked for confirmation, type: y and ...
... hit Enter.
You'll be asked to select your choice:

Hit the space bar to select apache2:

Then hit your keyboard's Tab key to select <Ok> and ...

... hit Enter.
The system will be busy for a while. When it's ready, some apache modules should be enabled. Select and copy:
Then paste and run the code in Terminal:
When the system is ready, it'll invite you to restart the apache server on a line stating:
Select and copy:
Select and run the code in Terminal:
You'll get some kind of confirmation afterwards:
Waiting .. is not really reassuring. Is apache indeed running again? You may ask the system about the server status. Select and run:
Paste and run the code in Terminal. The system should tell you the webserver is running:
21a. Install Pure-FTPd and quota
Pure-FTPd is a file transfer server. The quota module allows for limiting user space.
Select and copy:
Paste and run the code in Terminal. The system will be busy for a while.
21b. Tweak Pure-FTPd
Running Pure-FTPd from inetd means you will have to startup a new apache process for every connection. We don't want that, so we'll replace inetd by standalone in the proper configuration file.
Users using FPT should be confined to their own site, so they must be chrooted. In the configuration file we'll change false for virtualchroot to true.
Select and copy:
Paste and run the code in Terminal. Once the configuration file has opened, hit the i key to start editing and move the cursor to inetd on the line starting with STANDALONE_OR_INETD.

Replace inetd by standalone:
Next, move to false on the line starting with VIRTUALCHROOT:
Replace false by true:
Save file and quit vi by hitting Esc and typing :wq.
Since we do not want inetd to start Pure-FTPd, we have to edit the inetd.conf file.
Select and copy:
Paste and run the copied code in Terminal. You'll see:
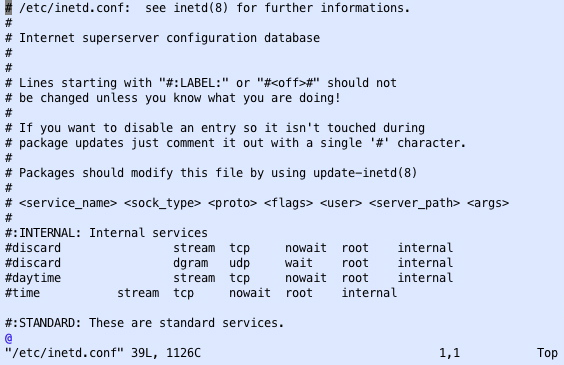
Scroll down until you see a line starting with: ftp stream tcp, move the cursor there and hit the i key to start editing:

Comment out this line by typing a hash #:
Save file and quit vi by hitting Esc and typing :wq.
Now restart inetd.
Select and copy:
Paste and run the code in Terminal. You'll get this result:
As you can see, inetd will not start the FTP server. That's what we wanted.
We'll do what inetd doesn't: start Pure-FTPd.
Select and copy:
Paste and run the code in Terminal. Confirmation that the FTP server is running looks like this:
PureFTPd doesn't show hidden files such as .htaccess yet. Since we want to be able to see those files on the server, select and copy:
Paste and run the code in Terminal.
Next, restart Pure-FTPd. In order to do so, select and copy:
Paste and run the code in Terminal. Now Pure-FTPd will show hidden dotfiles such as .htaccess.
21c. Configure quota
Quota are to be configured in the file fstab.
Select and copy:
Paste and run the code in Terminal.
In the open fstab file, locate the line with <mount point> / for root. Below, it's the 5th line.

Following the code fragment errors=remont-ro add: ,usrquota,grpquota

Save file and quit vi by hitting Esc and type :wq.
Now enable quota.
Select, copy, then paste and run these lines one after the other in Terminal:
On the screen, nothing seems to be happening, but don't worry.
Now select and copy:
Paste and run the code in Terminal.
The system will be busy for a while and then show some results:

Now we're going to turn quota on. Select and copy:
You'll get this confirmation:
On to the next page.