

Step Ten • DNS • Webalizer • Webmail
22. DNS server
- Preparing the system for MyDNS installation
- Download and build MyDNS
- Static external IP address or dynamic IP update service
23. Vlogger, Webalizer, Jailkit, Fail2ban
- Install Vlogger and Webalizer
- Install Jailkit
- Install Fail2ban
24. SquirrelMail
- Install SquirrelMail
22a. Preparing the system for MyDNS installation
The MyDNS name server, used to convert domain names to IP addresses on the world wide web, requires some pre-installed modules like g++ and gcc.
Select and copy:
Paste and run the code in Terminal. Continue? Type y and ...
... hit Enter.
22b. Download and build MyDNS
Debian Lenny comes without MyDNS, so we have to download and build it ourselves.
First change directories and go to tmp (temporary). In Terminal, run:
cd /tmp
Terminal will show you're inside the tmp directory:
Download MyDNS. Select and copy:
Paste and run the code in Terminal.
In order to extract (untar) the file, select and copy into Terminal:
Run the code to untar the file. This will create directory mydns-1.2.8. Switch to this directory by using the cd (change directories) command.
TIP Now here is a trick: you don't have to type the complete name of the new directory. Type cd and the first character – in this case m – and then hit your keyboard's Tab key. The system will complete the name for you.
Type cd m
Now hit the Tab key:
The system has completed the name. Hit Enter to swap directories.
Then it's time to configure MyDNS. Run: ./configure
After the process you get this message:

The system tells you what to do next.
First run: make in Terminal, as shown above.
After that, run: make install
You'll get a message stating MyNDS has been installed:

We have to create a script to start or stop MyDNS. Opening a non-existant file in vi always makes vi create a brand new one. Select and copy:
Then run this code in Terminal:
Select and copy the code for the new file:
In the newly created file, with the cursor in the top line ...

... hit the i on your keyboard to start editing (--INSERT--) ...

... and then paste the script code (Ctrl-V).
Stop editing by hitting Esc, then save the file and quit by running :wq as shown below.

Now add execution permissions for the script.
Select and copy:
Paste and run the code in Terminal:
Finally, make the script run at boot time.
Select and copy:
Paste and run the code in Terminal:
You're ready installing and configuring MyDNS when you see something like this:


23a. Install Vlogger and Webalizer
Vlogger is a piece of code dealing with large amounts of virtualhost logs. Webalizer is a server log file analysis program producing usage reports for viewing with a web browser.
Select and copy:
Paste and run the code in Terminal:
Continue? Yes, so type y and ...
... hit Enter.
When installation is ready, you could choose to have your Webalizer reports automatically numbered up.
Edit webalizer.conf in vi. Select and copy:
Paste and run the code in Terminal:
The line you have to edit is probably not immediately visible, as you see here:

Using the arrow keys on your keyboard, scroll down to the line:
#Incremental no

Put vi in editing mode by hitting the i key, then remove the hash # and change no to yes to make the line look like:
Save the file and exit vi by hitting Esc, typing :wq and hitting Enter.
23b. Install Jailkit
Jailkit is a set of utilities to chroot (limit) SSH users to specific files. It's necessary to do this now, before installing additional software like hosting control panels such as ISPConfig.
First, install code-generating tools like flex and bison.
Select and copy:
Paste and run the code in Terminal:
Continue? Yes, so type y and...
... hit Enter.
Then go to the tmp directory. In Terminal, type:
cd /tmp
Download Jailkit. Select and copy the following code:
Paste and run the code in Terminal:
Next, select and copy the following untar command including the first character of the Jailkit app:
Paste the code snippet in Terminal but don't run it yet:
Hit the Tab key to complete the file name:
This was another example of how to use autocomplete by hitting the Tab key.
Next, hit Enter to untar the file.
Following the untar process, switch to the Jailkit directory by first typing: cd /j
... then hitting Tab to autocomplete the file name:
Hit Enter, then type: ./configure
When the configuration is ready, run make:
When the make process is ready, run make install:
You may now delete the Jailkit package from tmp directory.
First move up from the jailkit-2.5 directory to tmp by running cd ..
Type the directory delete command rm -rf and the first character of the file name, j:
Hit Tab to autocomplete the file name but don't run the code yet.
Add an asterisk * to delete all files beginning with jailkit-2.5:
Hit Enter.
Now let's check what's inside the tmp directory. Run ls to list all files in the current directory, i.e. tmp:
If you see this:
... it means there are still 2 items in the tmp directory. If you want to, you may delete these files by running:
rm -rf mydns-1.2.8*
23c. Install Fail2ban
Fail2ban scans log files like /var/log/pwdfail or /var/log/apache/error_log and bans IP addresses that make too many password failures.
Select and copy:
24a. Install SquirrelMail
SquirrelMail is a webmail package allowing to send email from a web page at any location.
In order to install SquirrelMail, select and copy:
Paste and run the code in Terminal:
Continue? Yes, so type y and ...
... hit Enter.
When the installation is ready, create a symlink (symbolic link) inside the webmail directory. Select and copy:
Paste and run the code in Terminal:
Then configure SquirrelMail. Select and copy:
Then, paste and run the copied code in Terminal:
You'll see this screen:

You're told on the screen which options are available, for example: Set pre-defined settings for specific IMAP servers. That's option D.
Following Command >> type D
... and hit Enter.
In the next screen you have to choose your IMAP server. That's Courier.
Following Command >> type courier
... and hit Enter. In the next screen you'll see the line: Press any key to continue...
Just hit Enter.
Then save the data. Following Command >> type S
... and hit Enter. The configuration has been saved ...
... so hit Enter to continue.
As you can see, it's time to quit. Following Command >>
... type Q
... and hit Enter.
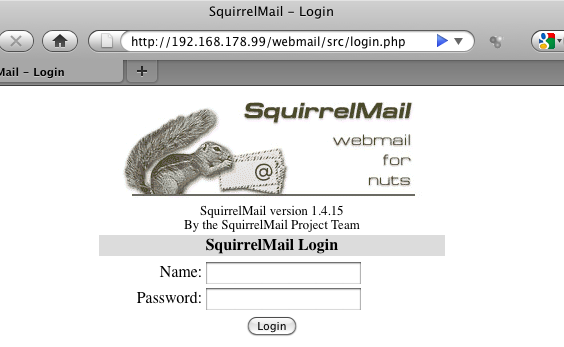
You can now access SquirrelMail internally under http://192.168.178.99/webmail or under your equivalent for http://server01.yourdomain.com/webmail.
If your server is online, you may also access SquirrelMail using the external IP addres followed by /webmail.
The system is now ready for ISPConfig3. Go to the next page.